spider enclosures

buthus

Arachnoprince
Old Timer
Joined
Jun 8, 2006
Messages
1,381
I keep mostly widows, although in the past I have had other true spiders. Usually I build simple glass "box" enclosures for my display spiders and use jars and cups for the rest. Working on expanding my widow collection ...going crazy with it ...trying to trade/buy any latro species available. I also decided to build some nice new enclosures ...more elaborate, with design based on what I WISH I had instead of whats good enough. I have built double and triple enclosures in the past, but they have been nothing more than a glass box with seperators glued in.
I had this prototype sitting around unused for a few months. Its a bit rough and not as well designed as I want. This ones acrylic and wood with some rapidset cement molded "cells" and threaded feeding caps from hydrogen peroxide bottles.
This one was built with L.hesperus in mind.

With the lid and bottom it is about 12.75" high by 14" wide and the glass (OD) is 2.75" deep


Hesperus don't require structure or substrate ...the glass walls become the structure and the space gets completely filled with webbing. But I added the "cells" for a couple reasons. One, the cells serve as a hidding place of course. And, usually the widow's main structural web lines will lead to and around her den. If there isn't some sort of den structure, she will rely more heavily on the enclosure's lid. This obviously causes trouble when the lid gets opened ...makes a mess out of her web and a confuses the spider.
I molded the cells so that they are hollow so I can easily retreive egg sacs. Some paper will have to sub-lid the cell opening otherwise she will web up the enclosure lid within her den.
Another pic...


I decided to build 4 of these, but with a more elaborate design. This time I used heavy 8th inch window glass. The lids, bottoms and seperators had to be able to be drilled, so they are acrylic.

These are also 12.75" x 14" x 2.75"


These are just wide enough to get my hand into for cleaning. I also wanted the structure to be connected to the seperators. The seperators slide down a track and can be easily taken out, altered and interchanged with all four enclosures. Each enclosure required some tweaks here and there, (glueing glass together along with the hand "crafted" wooded parts will cause this) but overall all the parts are interchangable.

This one is to be populated with three L. geometricus.


You can't see it, but each chunk of wood has a half inch hole drilled into it's top ...about an inch deep or so. I plan on experimenting by adding some soil or something else that will retain water to keep the humidty up a bit for the browns. I can add water via a vent hole using a syringe. Not sure how well this will work, but I think it should ...may require further design tweaks such as capping the hole off with a smaller opening so the water evaporates at a slower rate.

a closer look...


The back...


Two L. tredecimguttatus along with one of my oddballs (mactan?) that I found locally will move into this one...


I have read somewhere that L. tredecimguttatus are found in some regions to reside in grass and I have been informed that many are found in dry scrub. So I will give them something of that sort. Rapidset cement was once again used here for the "scrub" base and the root top. (along with some rock and sand/dirt) The scrub base could have covered the entire bottom, but I have vented the enclosure bases and didn't want to negate that effort.


Showing how the structure is attached to the acrylic seperators...


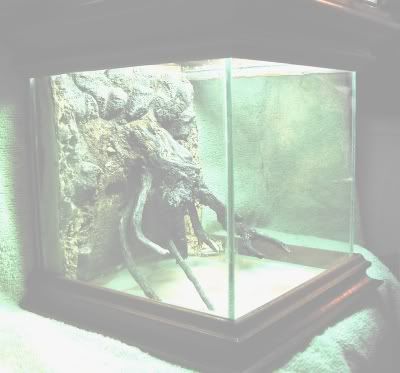
Todd Gearheart sent me a K.hibernalis for a freebe. Interesting spider... a fairly large crevice spider. I have found similer species around here, but never as big as K.hibernalis. Wanted to build her something that has the potential of a nice web display.
Demensions including the lid and base is 9.25" x 11" and the glass is 3.5" deep (OD).


The "stone wall" is cement. Made with 3/8th inch luon (thin plywood) and lathe with rapidset cement. The luon has a frame with grooves that slide down on wood rails.


The back...
I limited her den space so she wouldnt just end up making her web in the back. Not sure what will happen.


Couple more veiws...


I moved her in and she found the crevice. So far she has only webbed up her lair in the back. Made sure (forced) a couple crickets into her den ...she has eaten, which is a good sign. Keeping her dark with black paper in the back. Hopefully she will make her web in the front soon. She came with slings (tons) so if/when she dies, I will be able to try the enclosure again. A younger sub-adult may adjust better... who knows.
If she webs I wil take some pics ...of course.


The widows will be added today.(hopefully) I needed to allow the glue used for acrylic to vent completely off. Takes a couple of days, but it is hard to really be sure its not still venting spider killing gases.
 
Last edited:

sammyp

Arachnosquire
Old Timer
Joined
Apr 17, 2006
Messages
146
Those are some truly stunning and creative enclosure ideas mate. You've certainly got my mind ticking over on how to improve my own true spider tanks.

Very impressed:clap:
 

Splintercell

Arachnosquire
Old Timer
Joined
Aug 15, 2006
Messages
83
enclosure

Well,

I have to agree with sammyp.
Very nice enclosure :clap:
Very creative indeed.

Kind regards, Tom.
 
Last edited:

PoPpiLLs

Arachnobaron
Old Timer
Joined
Mar 31, 2006
Messages
427
Those are amazing :clap: , I cant wait to see pics with the spiders settled in :D
 

mackids

Arachnosquire
Old Timer
Joined
Nov 10, 2005
Messages
102
beautiful enclosures! Thanks for sharing I have been thinking of how I was going to display my latrodectus'. You've inspired me!
 

rex_arachne

Arachnobaron
Old Timer
Joined
Jul 9, 2006
Messages
336
great enclosure designs and beautiful set ups. wish i could build equally impressive structures. :clap:
 

buthus

Arachnoprince
Old Timer
Joined
Jun 8, 2006
Messages
1,381
Thanks for the comments.
They are far from perfect when it comes to design ...perfection will never be achieved, but major design flaws shouldn't be ignored.
Two of the four have been built but not assembled. I think I will have to scrap some of the parts and get them right.
Major problem is that even though they are made to alter and interchange parts, they are still a one time assemble for three spiders. There is a lot that can happen with one spider let alone three.
The main lid on these has to be removed in order to slide the separator/structure panels out. That alone will cause grief. And adding to that, because each cell shares a separation panel, if one needs to be removed, two spiders are affected. This is especially true of the separation panel that has structure on both sides. The solution(s) are not impossible, but hard enough to have made me ignore this problem when I built the first two. First I have to redesign the top lid so that the track that is over a separator panal is not connected to the main lid. It has to be connected to the top of the separation panel. Each separation panel will then have to become two panels. That way each will not share a side with two spiders. I am not sure if I can make a wooden track that is too much thinner to allow two panels next to each other without looking too fat. I will try it maybe two ways... a single double track or two single tracks glued together. These are cut using a full size table saw ...I wish I had a hobby table saw. Cutting these is a bit inaccurate (but acceptable...almost) and fairly dangerous ...thou I can reduce the danger aspect by using a band saw in conjunction withe the table saw. Another option...I have seen specialized aluminum glass channel and "T"s ...hard to get and expensive at that.
No matter what I do, I do know that I want to be able to manipulate and/or change one cell without disturbing another.
Further more, the main lid has to be bolted or latched down secure. One easy solution that would look ok is a small bolts w/wing nuts securing both ends. I piece of wood would have to be glued to the glass on each end, but I think this could look ok as long as I can find a bolt/wingnut that is smaller than any I have seen before ...might prove to be a frustrating shopping experience. Got to break out the Mcmaster-Carr catalog and see what is available.

There is a couple other minor things that are easily solved. Though, the most worrysome of these is that a couple of the slider lid panels don't click in snug. The ones that do, do so because the channel I cut wasn't perfect and that causes an offset between the short end tracks and the long track. Imperfection actually taught me something in this case. With a better (smaller and more accurate) saw I could easily control this and make it part of the design. For these and for now, I have solved the problem with the couple loose panels using a small piece of clear tape on the end edge of the acrylic which creates a bit more of a snug fit.

Anywho...
Six spidies have new homes.
The treds went crazy exploring the grass and plant stocks. They are one of the smallest species and I suspect they evolved that way because they fill a niche in the grass...so to speak.
My male expired a couple nights ago. :( I need to get another ...soon!


The geos found the perfect hiding holes that I had hoped they would use within the first few minutes of their introduction. To top that off, one thought her new den nice enough to make a true go at it... she started making her sac within a couple of hours after her introduction.


Geeze... these browns have produced 5 sacs already! I'm going to be up to my neck with browns! :eek:
 

sammyp

Arachnosquire
Old Timer
Joined
Apr 17, 2006
Messages
146
Wow, you must be doing something right if they're making sacs that fast. And such attention to detail with those flaws.... you aren't a virgo by any chance? :D

Well, just to let you know, you had me up until half twelve last night reworking some of my enclosures, damn you! Thanks for sharing the ideas,

Cheers
Sam
 

buthus

Arachnoprince
Old Timer
Joined
Jun 8, 2006
Messages
1,381
Wow, you must be doing something right if they're making sacs that fast. And such attention to detail with those flaws.... you aren't a virgo by any chance? :D

Well, just to let you know, you had me up until half twelve last night reworking some of my enclosures, damn you! Thanks for sharing the ideas,

Cheers
Sam
Glad you got inspired.

Only that one brown made a sac in the enclosure (she was ripe) the others (I currently have five) did so in their temp containers and one made a very small sac while in transit.

The prototype enclosure I showed first has caps/threads from 16 fl oz. hydrogen peroxide bottles. They make great feeder caps and only cost 99 cents. I have used other caps from all kinds of bottles and snap on containers but my favs are these and also caps/threads from those small plastic red-capped spice containers that you can get from any grocery store. The H2O2 caps are that brown plastic which seems to glue very well using plexy/acrylic glue. White and clearish plastics dont do as well and with those I use a bead of aquarium sealant glue, but this eventually fails unless you use a liberal/messy bead. Silicon is not a good product for acrylic and other plastics.
Anyway, the reason I brought this up was because most bottle caps/threads are too high and allow the spider to crawl into it and in some cases I have had widows decide to make the feeder holes their hideout. That is no good.
One trick is to glue in a plug within the cap. I just cut the plug out of wood using a hole saw and glue it in with aquarium sealant. As with any case glueing plastics with silicon, a little sanding helps and the hole produced from drilling the plug also grabs the glue.
Heres a pic showing what Im talking about...
 

:wumpscut:

Arachnosquire
Old Timer
Joined
Dec 28, 2005
Messages
108
neat idea

i use all hardwood too but not the kind you do. also, i think that sliding door idea is cool too. what did it cost to build, 20.00 or less? i priced the materials you used and think it could be built as is very affordably; 12.00 probably but i also think you should consider a different type of venting. great idea though. much like our duplexes. nice to see the dried plants, just love it. great tutorial hey.
 

P. Novak

ArachnoGod
Old Timer
Joined
Sep 12, 2005
Messages
6,215
Talk about impressive!!! Mind giving us some detail on how and what you used to build it. WOw very nice.
 

:wumpscut:

Arachnosquire
Old Timer
Joined
Dec 28, 2005
Messages
108
I can

Talk about impressive!!! Mind giving us some detail on how and what you used to build it. WOw very nice.
I can post a cut list and supplies list if needed, these are very easy to build. i wouldn't use glass myself as with his design, air will stay stagnant and since I a scorp-T' guy air flow is important.
 

desertrat

Arachnopeon
Joined
Aug 26, 2006
Messages
9
Buthus,
With a thin kerf blade and some finger boards you should be able to get pretty fine (and safe) cuts for the double seperation panels. Of course, if you don't already own a thin kerf blade, it'll set you back a pretty penny.

In any case, these are indeed some mighty fine enclosures. They really make the plastic kritter keepers look shabby! Thanks for sharing!
 

buthus

Arachnoprince
Old Timer
Joined
Jun 8, 2006
Messages
1,381
Buthus,
With a thin kerf blade and some finger boards you should be able to get pretty fine (and safe) cuts for the double seperation panels. Of course, if you don't already own a thin kerf blade, it'll set you back a pretty penny.
I think I have one around here. Good advice.
Our workshop/garage is a mess ...we are insulating it, building new benches and shelves ...this while I played around building the enclosures. We have a nice router table, but its been covered with crap for months. I can't wait to get it out and spinnin' ...should be able to avoid the table saw all together when it comes to this little accurate sh!t.


I can post a cut list and supplies list if needed, these are very easy to build. i wouldn't use glass myself as with his design, air will stay stagnant and since I a scorp-T' guy air flow is important.
Depends on what you consider easy I guess. I am an artist, work construction, model building etc ...and currently work in the film industry building sets. These actually took me some time. Yes, a little design and tweaking on the fly slows things down a bit, but cutting, sanding and glueing intricate parts, drilling tons of holes in acrylic, finding interesting structure and cutting/grinding it down square, etc...etc.. these tasks make it a nice meditative experience, but not necessarilry an easy one. Once all the design flaws are worked out and you have your tools set up along with whatever jigs, templates...etc, then these could be whipped off fairly fast. I bet I could make ten a day, if I had the space to work in multiples.
Having the tools, knowing how to use those tools, understanding materials and understanding adhesives ...not skills that everybody has. But, when it comes down to it, glueing some precut glass together and adding a bottom and lid to make a simple enclosure is hardly rocket science. I doubt a bear could do it, but a clever lemur? ...probably. Complexity can be added from there if you feel it is needed. I felt some complexity was/is needed.
Materal costs for these is a bit lost to me, because I had everything laying around except the glass. Wood was all cut from scrap pine ...I didnt even bother trying to match grain and color. Acrylic sheets ...I have a bunch left over from another project. I forget what an 4 x 8 ft of 8th inch clear costs these days. I bought heavy window pane glass ...sometimes called double weight (or something like that) it is supposed to be 8th inch, but it is slightly thicker. Single or 16th inch glass would be fine ...and cheaper and lighter for that matter. For the 4 widow eclosures and the K.hibernalis enclosure, the glass came to around $80. I usually cut my own glass because buying larger sheets and using it wisely can save a good amount of cash. But, this time I had my fav glass guy cut some to spec for me. When they cut glass, the cost for each piece is based on standard sizes that they charge for. In otherwords they charge you for the size that comes closest to your specified cut. This is why cutting your own can save some $$. (and waste less glass)

BTW, I disagree... glass is the best material for several reasons. It looks the best, it reflects light more consistantly than acrylic (which not only looks better it is better for photography). It scratches less easily, cleans more easily and doesnt require special cleaners. Silicon sealants are far less toxic than the adhesives used for acrylic ...not only that, but glue fumbles can be cleaned with glass ...where acrylic adhesives actually melt into the material to create a bond. One little mess-up and you have a permanent eye sore. Glass is just easier to assemble overall... lay down some adhesive, place your panel to it, square it up, prop it with something(or use a jig) and its done. Acrylic is about the same, but you just need to be that much more carefull. It doesnt remain true...always bent somewhat and what I said about the glue...


As for ventilation ...these have plenty for what I'm keeping in them. As long both the bottom and the lid are vented air presure changes outside the enclosures constantly force air in and out. Though, as with anything else, I can improve on this. Not only to get some more air flow, but for a quicker and sane construction. ...drilling tons of 8th inch holes in acrylic can be a real drag. I'm thinking ..hole saw cut and round wooden frame with nylon or fine mesh ...two of these for each cell, top and bottom. I have built full mesh top/bottom enclosures before ...these are fine for arids, but tough to keep species that need humidity.


Jeeeese! I'm sitting here typing this crap and I just missed one of my treds going thru her final molt! :wall: Had the camera set up and ready too. :rolleyes: Widows molt sooo darn fast ...I have yet to capture it on film.


Anywho...
Here is Halle (hesperus ..almost 2 years old) happy with her cement hiding place in the first encloser I showed.


This is the oddball hasperus (mactan blood in her?). Call her Rosario. :p Hanging out where I was hoping she would.
(Some more pics of her will be be posted in the Latrodectus Pics thread. Very brown abdomon with a nice marking above her spinnerette. ) Very odd for the hesperus out here.


Hard to get even a decent shot of my K. hybernalis while she hangs inside her crevice den. Still has not ventured out, let alone spun any webbing for hunting. I'm bummed ...but remaining hopeful.


Hey... any ideas to go toward some Loxosceles enclosure design? I would love to hear them.
I'm looking at recieving some desert flavors ...probaby L. apache. I am actually getting them for another trade, but that deal may be flushed and it looks like I will be stuck with the little #^(ers! Thinking cave dwelling, sort of like the crevice enclosure, but much more real looking and pretty.


Jeese...long post. :rolleyes: Too awake to sleep, too tired to do anything productive.
 

:wumpscut:

Arachnosquire
Old Timer
Joined
Dec 28, 2005
Messages
108
get a mitor saw, some 3/4" trim moulding and try to use a blade with at least 60 teeth. rockler has them for 40.00 i think. you don't need a think kerf honestly. cut 45 degrees to make the frame, silicone should be used to adhere the wood to the glass, elmers wood glue is cheap and will work for the frame. 1/8 window glass can be used but you should consider adding some airflow. you can save more if you use mesh or windowscreen and frame for the bottom insread of drilling but either way is fine. as for the feeder door, get 1/2 or even chair rail moulding and build the same frame as indicated in the photo. pretty easy, most of us know someone with a mitorsaw, table saw and some time to help. this is a pretty straight forward design mike and yes, just call. the glass is easy to cut with a short stop at any glass shop, they love to help. watch the seams on the glass when glueing. i have my way and you'll have to try and play around with what works for you to keep it clean. use a belt sander or even a 200grt hand sander/ paper to bring down the edges on the glass. maybe i'm pissing someone off by doing this but a client asked me to view this and build one for him.
sorry this photos sucks:
 

buthus

Arachnoprince
Old Timer
Joined
Jun 8, 2006
Messages
1,381
:wumpscut:, not sure who you're talking to. ?


Nice enclosure. I'm always torn between a utilitarian "bauhaus" style and a more decorative sort of thing. I tend to go with the simple utility look. Yet, I could see pulling out some nice router bits and making some beautiful molding for these ...maybe if I was going to build these for a living room display.


The 3 hesperus that I put into the "prototype" enclosure seem to like the space and are using the hollow cement "cells". Not as natural looking or pretty for the eyes, but as they say...form follows function.
Feeding time for the trio...
 

P. Novak

ArachnoGod
Old Timer
Joined
Sep 12, 2005
Messages
6,215
The 3 hesperus that I put into the "prototype" enclosure seem to like the space and are using the hollow cement "cells". Not as natural looking or pretty for the eyes, but as they say...form follows function.
Feeding time for the trio...

I think the cement blocks look perfectly natural for the widows, I find tons around cement blocks.
 
Top