120 Gal Bubinga Plywood Vivarium build for DART FROGS, with waterfall (SLOW BUILD)
- Thread starter xTimx
- Start date
xTimx
Arachnoknight
- Joined
- Dec 30, 2012
- Messages
- 187
UPDATE:
alright soooooo over the weekend i got the false bottom pretty well done. screwed up my european vent, made it too long so i made it again tonight. soooo here's the pics


here's the european vent mocked up.. its not glued into place just yet. and i still have to put the screen into the screen border.


thats all for now.
This sat i'll be taking the diamond blade to the slate and mocking up the waterfall!
cheers guys!
P.S lemme know what i can do for tips and tricks! i'm all ears
alright soooooo over the weekend i got the false bottom pretty well done. screwed up my european vent, made it too long so i made it again tonight. soooo here's the pics
here's the european vent mocked up.. its not glued into place just yet. and i still have to put the screen into the screen border.
thats all for now.
This sat i'll be taking the diamond blade to the slate and mocking up the waterfall!
cheers guys!
P.S lemme know what i can do for tips and tricks! i'm all ears
shebeen
Arachnobaron
- Joined
- Jun 24, 2011
- Messages
- 383
I like the way you used wire ties to fasten the risers to the egg crate. Good idea.
dcsnowrider
Arachnopeon
- Joined
- Aug 8, 2013
- Messages
- 9
Fantastic build! keep up the good work
xTimx
Arachnoknight
- Joined
- Dec 30, 2012
- Messages
- 187
alright....here's the update of the waterfall. building it is alot harder than it looks.


here's where it jumps in size haha. and in shape.


here's where i added the output of the water spout. i may have to add in a T to split off the water to make it more even. this is still a dry fit as i have to number every rock and spray foam it into place

and the top cap of it

top view of the waterfall

the kitchen sink drain is there for perspective view.
---------- Post added 08-17-2013 at 10:24 PM ----------
i'm adding another pic, i'm also adding a ring around the base of the pond so the substrate transfers into the rock nice and smoothly

here's where it jumps in size haha. and in shape.
here's where i added the output of the water spout. i may have to add in a T to split off the water to make it more even. this is still a dry fit as i have to number every rock and spray foam it into place
and the top cap of it
top view of the waterfall
the kitchen sink drain is there for perspective view.
---------- Post added 08-17-2013 at 10:24 PM ----------
i'm adding another pic, i'm also adding a ring around the base of the pond so the substrate transfers into the rock nice and smoothly
xTimx
Arachnoknight
- Joined
- Dec 30, 2012
- Messages
- 187
adding another pic of the whole tank with the waterfall and the driftwood set up together, along with the board that'll serve the base of the sherman vent system haha

xTimx
Arachnoknight
- Joined
- Dec 30, 2012
- Messages
- 187
Update:
since i am no longer doing the euro vent, i had to redo the false floor. made it longer and added some more supports. and going to be adding even more support. i am also at the point where i am ready to add the waterproofing. which will probably be applied over the weekend.
update pics here


also have to draw out and drill the holes for the drains and misting nozzles.
since i am no longer doing the euro vent, i had to redo the false floor. made it longer and added some more supports. and going to be adding even more support. i am also at the point where i am ready to add the waterproofing. which will probably be applied over the weekend.
update pics here
also have to draw out and drill the holes for the drains and misting nozzles.
JadeWilliamson
Arachnoknight
- Joined
- Apr 8, 2011
- Messages
- 207
Do you mind explaining what Sherman vents and European vents are?
xTimx
Arachnoknight
- Joined
- Dec 30, 2012
- Messages
- 187
UPDATE:
FOUR 20W, 17" GROW AND GLOWS! WOOOOOOOT


This is just 1 G&G mounted into a light socket.


on a side note. i drilled the holes for the drains and the output for the water

---------- Post added 09-05-2013 at 10:27 PM ----------
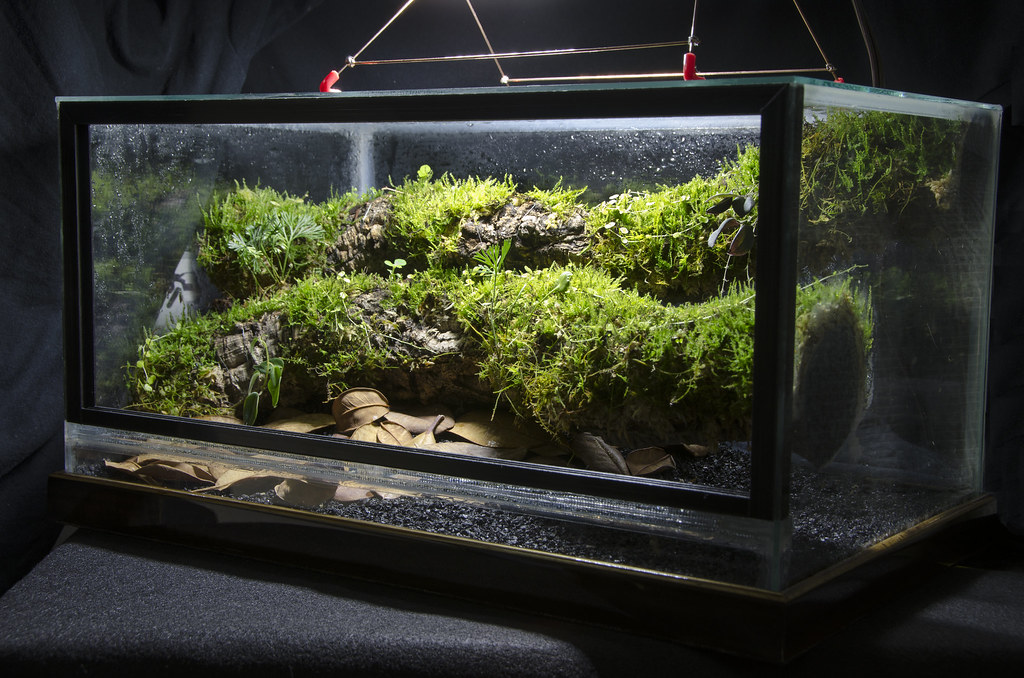
so a european vent has a "horizontal" style vent system. its very good for keeping the front pane glass from fogging up. but it does have some disadvantages though. like the space inside the vent can get dusty and dirty and i heard of people (lack of being motivated to clean it mind you), having spider webs inside. another thing is you have a chance of water dripping down into the vent as well too. and also the actual vent on the bottom takes up valuable floor space. this was important for me, cuz having more floor space was crucial for me and the frogs themselves.
here's a pic of the european style vent system.
here you can see there is 2 glass panes on the bottom with a vent attached to the top of the panes. the front glass pane has been carved to allow air entry and the back pane is left solid to direct the flow of air upwards. at the top of the tank in the back. there is a vent to allow better air flow for the tank. this reduces mold growth and prevents the front glass from fogging up.
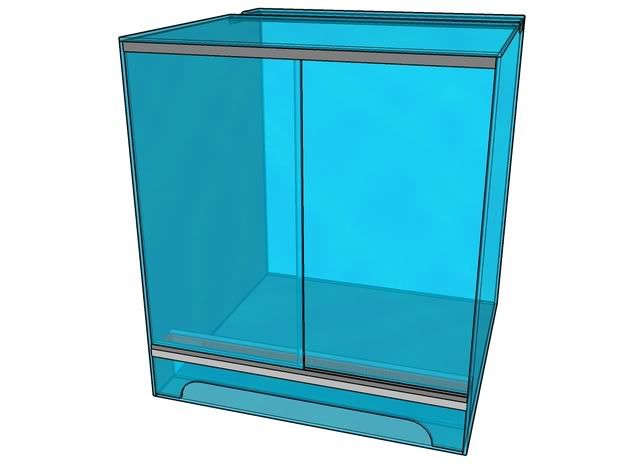
now the sherman vent system is a vertical vent system and its pretty much exactly like an exo terra tank where the vent is just below the sliding glass doors. but there's also a vent in the top of the back side tank.
the advantage to this vent system is that it only uses 1 pane of glass for support and also still keeps the front glass from fogging but not as good as the European style vent system. it also free's up valuable space for floor space.
any other Q's?
FOUR 20W, 17" GROW AND GLOWS! WOOOOOOOT
This is just 1 G&G mounted into a light socket.
on a side note. i drilled the holes for the drains and the output for the water
---------- Post added 09-05-2013 at 10:27 PM ----------
CERTAINLYDo you mind explaining what Sherman vents and European vents are?
so a european vent has a "horizontal" style vent system. its very good for keeping the front pane glass from fogging up. but it does have some disadvantages though. like the space inside the vent can get dusty and dirty and i heard of people (lack of being motivated to clean it mind you), having spider webs inside. another thing is you have a chance of water dripping down into the vent as well too. and also the actual vent on the bottom takes up valuable floor space. this was important for me, cuz having more floor space was crucial for me and the frogs themselves.
here's a pic of the european style vent system.
here you can see there is 2 glass panes on the bottom with a vent attached to the top of the panes. the front glass pane has been carved to allow air entry and the back pane is left solid to direct the flow of air upwards. at the top of the tank in the back. there is a vent to allow better air flow for the tank. this reduces mold growth and prevents the front glass from fogging up.
now the sherman vent system is a vertical vent system and its pretty much exactly like an exo terra tank where the vent is just below the sliding glass doors. but there's also a vent in the top of the back side tank.
the advantage to this vent system is that it only uses 1 pane of glass for support and also still keeps the front glass from fogging but not as good as the European style vent system. it also free's up valuable space for floor space.
any other Q's?
xTimx
Arachnoknight
- Joined
- Dec 30, 2012
- Messages
- 187
Update:
Start to apply my waterproofing. if anything its pretty much like drylok only its more grey. its consistency is like paint but REALLY REALLY chaulky. when it dries its great cuz its literally like rubber. peeled it away from my hands with ease.
anyways....here we go.....no turning back now.


First coat done. some places have high and low spots, i dont have any experience with this stuff so it was tricky to work with. you use alot of it. but yet you dont. to cover the tank i only used like an 1/16th of the gallon.


the corners were applied by a paint brush and it seems to stick to it nicely.
2nd coat will be done in 2-3hrs time now. will update as i go along.
cheers
Tim
Start to apply my waterproofing. if anything its pretty much like drylok only its more grey. its consistency is like paint but REALLY REALLY chaulky. when it dries its great cuz its literally like rubber. peeled it away from my hands with ease.
anyways....here we go.....no turning back now.
First coat done. some places have high and low spots, i dont have any experience with this stuff so it was tricky to work with. you use alot of it. but yet you dont. to cover the tank i only used like an 1/16th of the gallon.
the corners were applied by a paint brush and it seems to stick to it nicely.
2nd coat will be done in 2-3hrs time now. will update as i go along.
cheers
Tim
- Joined
- Aug 8, 2005
- Messages
- 11,095
Your workmanship and tools are excellent. Will you please bend a few nails over and pound them flat and make a few 88 degree cut offs so clutzes like me won't feel too envious?
xTimx
Arachnoknight
- Joined
- Dec 30, 2012
- Messages
- 187
This Comment made my day! thank you very much!
Stop it! I'm siding with snark. BTW, I'm making my own PDF viv now. Just siliconed background today.This Comment made my day! thank you very much!
xTimx
Arachnoknight
- Joined
- Dec 30, 2012
- Messages
- 187
Sweeeeet! You'll have to post pics when its done.
Btw I just did my 2nd coat. Made a mistake on the first coat. Can said to do 2 coats with the 2nd coat right angled to the previous and then wait between 2-3hrs before applying another coat. I will do 3 passes tonight then let it rest til maybe monday evening.
Because there will be standing water below the false bottom. Im going to be doing alot more coats on the bottom.
cheers!
xTimx
xTimx
Arachnoknight
- Joined
- Dec 30, 2012
- Messages
- 187
What bout iso's/springtails?
cheers!
xTimx
---------- Post added 09-07-2013 at 10:00 PM ----------
2nd coat up! looking much better now


I know i messed up on the first coat. cuz i just read the can before applying my 2nd coat. and it said to make two passes and the second pass being at a 90 degree turn from the first. so this is why it looks much better now! will be applying a 3rd coat tonight in about an hr and a half.
i'm thinking 5-6 coats all around. Then the rest will be applied on the bottom. going to be using up the whole can on this tank.
cheers!
xTimx
---------- Post added 09-07-2013 at 10:00 PM ----------
2nd coat up! looking much better now
I know i messed up on the first coat. cuz i just read the can before applying my 2nd coat. and it said to make two passes and the second pass being at a 90 degree turn from the first. so this is why it looks much better now! will be applying a 3rd coat tonight in about an hr and a half.
i'm thinking 5-6 coats all around. Then the rest will be applied on the bottom. going to be using up the whole can on this tank.
- Joined
- Aug 8, 2005
- Messages
- 11,095
Sorry to be fussy but could you list the tools, saws and etc you are using? How you are getting those dead on plywood cuts and so forth.
xTimx
Arachnoknight
- Joined
- Dec 30, 2012
- Messages
- 187
basic tools really. i have a table saw here. but the 4x8' board i had gotten cut at the place where i bought it in the first place. other than that, just basic cut off saws, router, sander. i have a jointer here too but i didnt use it on this build. small tools such as wire cutters were used to shape the egg crate, pliers, hammer. what ever u need to get the job done was used.Sorry to be fussy but could you list the tools, saws and etc you are using? How you are getting those dead on plywood cuts and so forth.
this is nothing so far. the best is yet to come. i still have to build a canopy for the tank and then i'm going to skirt the tank stand as well too. the canopy and skirting will be made from 1/4" bubinga plywood. then i'll use corner molding to decorate the whole thing.
for a finish. i'm still unsure yet. bubinga ply, is only one dimensional. so there is only so much i can do. probably a shellac for sure. maybe a tint under it, and a danish oil to protect it. i have a spare piece of bubinga i'm going to do tests on for finishes.
cheers!
Tim