Multi-purpose, protective cage for up to 4 T. DIY.

Bloodrazor

Arachnopeon
Joined
Dec 7, 2021
Messages
16
Hi all,

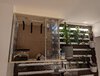
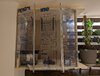
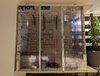
Wanted to share with you an idea for enclosure protective cage (child at home) which main purpose is to house up to 4T (currently 1 slot occupied from 4 planned) safely from child and child from the spider.
This also develops into further main functions:
- easy and safe feeding, this I hope to build live bug dispenser with the use of sensors and other electronic contraptions.
- easy and safe watering, this again with the use of simple water dispensing system.
- build in climate-control (cooling / airflow and heating independently) - still thinking about details.

I am still waiting for many parts as I even managed to run out of plexiglass but managed to put together main frame.
Height 70cm (27.5in), width 80cm (31.5in), depth 40cm (>15.5in).

Cage is mounted on a decorative wall frame made out of pallets / skids but is fully detachable with a protection from pulling. Will provide more pics soon.
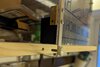
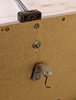
Main cage door handles are rather decorative and when pulled will slightly bend outwards plexi screen which will pinch screws on the edges of the frame preventing from opening. Handle is also mounted on a somewhat smaller screw so it would let handle being pulled from the frame and not open unless someone actually knows how to open it. Locks will be added at later stage.

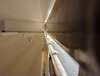
Simple 4 hooks (their height is incorrect and this will be fixed today) have a stainless steel pin drilled through which is retractable. Pin when engaged will prevent the cage from being accidentally detached.
Hooks are mounted with a slight angle so they would wedge themselves in the wood what will help keep the cage in one place and would not be sliding.

I am hoping to build enclosures fully modular what would allow me to decide or quickly change setup - whether I prefer one for arboreal or terrestrial.
I have also planned roll-away rail system for enclosures so I could take them out independently - details ones completed.
LED lighting will also be something that will squeezed inside.

10cm excess space on the right side will be used for controllers, dispensers etc.

I am not using any silicone yet - rather cutting everything as precisely as I can (hence I run out of plexi) - in the event I would need to modify or replace something. There is no more then 1mm space between any of the windows and mainframe.

Hope this would help anyone thinking not to have T because of kids ;)

Happy new year!
 

Attachments

Elyse71

Arachnopeon
Joined
Oct 10, 2021
Messages
5
I built something similar for mine except it's on a sideboard and under a sloping wall. No kids but cats, who admittedly have not shown the slightest interest in any of the T's, but better safe than sorry. Mines a bit less tech as I used adjustable vents for airflow and a heat mat on the back wall for temp control, but it's done a pretty good job of maintaining a steady environment. I just need to figure out cooling for the summer next.
 

Bloodrazor

Arachnopeon
Joined
Dec 7, 2021
Messages
16
@Elyse71

There is never enough you can do for those around you to protect them and your pets. That's why we had somewhat heated discussion on whether this should be a Tarantula. I love it and would not exchange it for anything in the world learning so much about them and how amazing and interesting they are. I am pretty surprised your cats showed no interested or maybe they could smell K.O. in the air :rofl:

Would you have some pics to share?

For cooling I suggest something discrete and small:
jeff bazos shop

These heat sinks are relatively flat what should allow you to place them on top of each other what should help with heat dissipation. By placing even some silicone at the ends you can direct airflow to go through the heat sink channels as much as possible in a snake shape and it should allow you to drop temperature by some 3-5 C - which is pretty awesome for a "passive" system. If air channeled inside just place in ice cold water and it'll do the job to avoid below components.

Fans (This brand is an overkill but you wouldn't have to worry about noise, vibrations and replacement in the next year):
8.2 m3/h 1,78 mm H₂O Noctua NF-A4x10 FLX lower air pressure
9.4 m3/h 2,26 mm H₂O Noctua NF-A4x20 FLX higher air pressure
I would say beneficial might be positive air pressure in the cage to prevent air from being sucked in from other places around and reducing effects of cooling. Above should do me just fine but if your issue are even higher temperatures here is something quick and simple:

Recommend 110%
If you'd build a simple small loop which would be re-fill-able with ice water you could increase temperature reduction by a significant factor. Just slap this on top, next to or on top of previous airflow system and let it run! This website has absolutely amazing quality products and I would not touch anything else when it comes to water cooling - I had experience with EKWB as an example - absolute trash and even worse customer service. This would require maintenance (flushing) probably once a month if you'd use tap water. If you'd use special coolant liquid (have dedicated containers to avoid contamination) should last you for many summers - AC on the cheap.
For a pump:
made in DE
Could not find any info on noise but would imagine not to be over 40-44dB on full power (30-50% power would imagine be more than sufficient).
I have ordered many items from these guys and have yet to received something that would NOT be made in Germany or that would be made in PRC - know your quality.

Condensation concerns: if you'd be afraid of condensation accumulating inside the pump because of cold liquid run through the pump you'd probably be right :D
Someone has to be first though xD I'm fairly confident this should not be much of an issue. Hope this helps :astronaut:
 
Last edited:

Bloodrazor

Arachnopeon
Joined
Dec 7, 2021
Messages
16
Further progress, managed to finish cage doors and I'm pretty happy with how it turned out. Clearances are ridiculously small what hopefully will allow me to avoid using any silicone. I've wasted 3 sheets of 120cm x 60cm of plexi but I haven't cut plexi before and don't have any advanced tools nor some fancy lasers to cut it with.

black 2.0 & 3.0
musou black
I am planning to use this paint inside. I am planning to do some photo shoots on top of a small nightvision system for some crazy shots and loops so I'm hoping this paint will help get rid of them pesky reflections and loss of focus. Anyone got some experience with black paints? Paint will obviously go on frame, wood, all metal parts - dunno much about so open for suggestions :snaphappy:
 

Attachments

Last edited:

Bloodrazor

Arachnopeon
Joined
Dec 7, 2021
Messages
16
I am testing and playing with Live feed and while it should mostly be on-line I will take the feed down for certain works and updates etc. My orders are being somewhat delayed to straight marked as "being lost" for some reason - I suspect fallout from Christmas? ISO / vid quality appears shite when light is week - working on this too. I will also try to make the feed clear by changing enclosure as soon as I can.

Nevertheless link to the live feed:
Milo's Villa

Next update will contain information about inside railings, brackets and mounts for spider enclosures - I have already pretty good idea on how to bite that topic (hint: involves TV flat mounts - with quick release functions).
 

Bloodrazor

Arachnopeon
Joined
Dec 7, 2021
Messages
16
PXL_20220118_202740589.NIGHT2.jpg PXL_20220111_165353482.MP.jpg
As mentioned earlier, I have used two TV mounts for cage holders / brackets. All individual brackets can easily be adjusted and moved around, they also have quick release function #lazy. This will also allow me to remove 2 brackets if I won't need them. This structure has some 4cm clearance which will allow me for wiring, pipes, airflow, heating and cooling system to be (MAYBE) pushed at the back (more or less) so front or side would not be obstructed. I am planning to create some sort of sheet which would go on top to cover all this mess. Locking mechanism will be based on a finger print cabinet lock just need to figure out locking mechanism so I wouldn't have to use more than one (this mainly cause it's already overkill anyway - may as well continue with such approach :wacky: ).

Next update will also include lighting system.
For this I am planning to experiment with water a bit and create custom light refraction tube of some sort. Light has interesting refraction going through water and I hope I could create amazing illumination which wouldn't be as eye-soaring as these LED's - dunno how I thought it wouldn't be enough light being described as semi-industrial (this is minimum setting)... :anxious: :hurting:
So I'm thinking now to get them led neon strips, place them in a small tube possibly partly covered with alufoil type of reflector just to block the light from viewers perspective. This being placed in a slightly wider in diameter tubing / enclosure and filled with water (matte finish) - I want to avoid directional light in a way - for photos / vids...still researching.
 

Edan bandoot

Arachnoprince
Joined
Sep 5, 2019
Messages
1,600
View attachment 408340 View attachment 408341
As mentioned earlier, I have used two TV mounts for cage holders / brackets. All individual brackets can easily be adjusted and moved around, they also have quick release function #lazy. This will also allow me to remove 2 brackets if I won't need them. This structure has some 4cm clearance which will allow me for wiring, pipes, airflow, heating and cooling system to be (MAYBE) pushed at the back (more or less) so front or side would not be obstructed. I am planning to create some sort of sheet which would go on top to cover all this mess. Locking mechanism will be based on a finger print cabinet lock just need to figure out locking mechanism so I wouldn't have to use more than one (this mainly cause it's already overkill anyway - may as well continue with such approach :wacky: ).

Next update will also include lighting system.
For this I am planning to experiment with water a bit and create custom light refraction tube of some sort. Light has interesting refraction going through water and I hope I could create amazing illumination which wouldn't be as eye-soaring as these LED's - dunno how I thought it wouldn't be enough light being described as semi-industrial (this is minimum setting)... :anxious: :hurting:
So I'm thinking now to get them led neon strips, place them in a small tube possibly partly covered with alufoil type of reflector just to block the light from viewers perspective. This being placed in a slightly wider in diameter tubing / enclosure and filled with water (matte finish) - I want to avoid directional light in a way - for photos / vids...still researching.
Be careful, water can act as a magnifier at certain angles.
 

Bloodrazor

Arachnopeon
Joined
Dec 7, 2021
Messages
16
Be careful, water can act as a magnifier at certain angles.
Yeah...but would also be a risk considering electrical equipment involved (heaters fans etc)...but all the effects you can make!

Have you guys seen led water walls? xD

Since it is quite difficult to find NMIC stuff - as they have no regards for safety and even "their pro" range led solutions have no grounding I decided to make another twist to this project... Will be running Corsair modular power supply for all energy needs which will allow me for a simpler build. This way can convert connectors accordingly to what I need them for. It will remove the need of having an extension lead for all the plugs and will add value to general "modularity" idea...found a bargain on bazos shop for rm550x for like 45£ for a new one 🤯 will find out what's the catch when it arrives... 🤷‍♂️
Planning on all this takes way longer than I anticipated - every next step I'm like: ok this should get easier now 🤣 ... I shall return with some more progress soon.
 
Top