More handmade arboreal enclosures

viper69

ArachnoGod
Old Timer
Joined
Dec 8, 2006
Messages
17,930
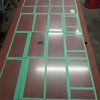
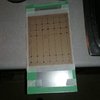
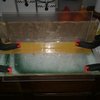
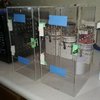
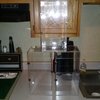
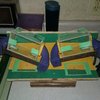
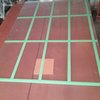
Finished these 3 last night, 16"X7.5"X7.5", from acrylic sheet 32"X66"X.160".
Just needs some sub, cork slab, foliage, water dish and occupants. :)
Now all you need to do is put up a nice video on how you did it :D

1. How did you arrive at 0.160" for the thickness of the acrylic. I've seen so many variations between the leading T makers on their acrylic thickness.

2. What did you use to keep the sides square? I've seen tools for this, as well as people who put the two sides to be joined inside a box sort of.
 

viper69

ArachnoGod
Old Timer
Joined
Dec 8, 2006
Messages
17,930
I second the request for a tutorial. :D
There's actually one guy on YouTube who has 3 videos, you may know however, that are pretty good. But more is better as each person has different approaches.
 

Tarantula20

Arachnosquire
Joined
Oct 19, 2014
Messages
93
Could not agree more a tutorial would be awesome, The reason I haven't made any of these is because of the fact there is so much variation on handmade acrylic enclosures.
 

Red Eunice

Arachnodemon
Joined
Mar 2, 2014
Messages
666
Now all you need to do is put up a nice video on how you did it :D

1. How did you arrive at 0.160" for the thickness of the acrylic. I've seen so many variations between the leading T makers on their acrylic thickness.

2. What did you use to keep the sides square? I've seen tools for this, as well as people who put the two sides to be joined inside a box sort of.
What? A video? I can't deprive one the privilege of learning through trial and error. Lol!
1. .160" is from the manufacturer of the acrylic. Have a local plastics supplier, carries just about any thickness and color you could need. Also has acrylic pipe from 4" to 18" diameter cut to length, but rather expensive.
2. I built a set of 90° wooden jigs and just clamp the pieces to them.
I did snap photos, kind of, as I was doing these. Type of epoxy I use. $32 for the acrylic $15 for hardware total $47 and around 3 hours of actual hands on work. I allow 2 hours for the epoxy to set firmly, these were done over a 2 day period. Might seem too long a period for many to do it my way but way cheaper than buying from on-line vendors. ;)
 

Attachments

Garth Vader

Arachnobaron
Joined
Jun 25, 2016
Messages
427
What are you using to cut the acrylic?
These are nice. Good work. Now you get to do the fun stuff- decorate and find an inhabitant!
 

Red Eunice

Arachnodemon
Joined
Mar 2, 2014
Messages
666
What are you using to cut the acrylic?
These are nice. Good work. Now you get to do the fun stuff- decorate and find an inhabitant!
Using this, with a straight edge guide, cuts out 3/32" of material. Like a hot knife through butter and less than a minute for each cut.

I've already got the Ts to put in them, 2 LVs and a P. regalis. Just waiting for some substrate to air dry, cork bark and foilage are ready.

Photo of some pokie enclosures built earlier this year. To date I've made 45 arboreal enclosures for my self and 10 for a friend in Blacklick.

@JumpingSpiderLady, thank you for the compliment.
 

Attachments

viper69

ArachnoGod
Old Timer
Joined
Dec 8, 2006
Messages
17,930
60" is from the manufacturer of the acrylic. Have a local plastics supplier, carries just about any thickness and color you could need.
Right, I'm aware of it comes in many thicknesses, just wondering what made you chose the one you did.

These are great acrylics from what I can see. If I was your neighbor I'd love it.
 

Red Eunice

Arachnodemon
Joined
Mar 2, 2014
Messages
666
Right, I'm aware of it comes in many thicknesses, just wondering what made you chose the one you did.

These are great acrylics from what I can see. If I was your neighbor I'd love it.
When I enter the place I immediately go to the "as is" area to see what's steeply discounted. Normally for 16"-24" tall enclosures I prefer using .180" thickness to build with. So I took a chance on this piece, 200th inch thinner, seems as rigid as previously built .180" ones. May bite me in the butt 10 years down the lane but doubtful. Lol!
I've used as thin as .118", but on much smaller sized builds. The thickest used has been .220" and only used on 2 opposing sides, rest was built using .180".
 

viper69

ArachnoGod
Old Timer
Joined
Dec 8, 2006
Messages
17,930
When I enter the place I immediately go to the "as is" area to see what's steeply discounted. Normally for 16"-24" tall enclosures I prefer using .180" thickness to build with. So I took a chance on this piece, 200th inch thinner, seems as rigid as previously built .180" ones. May bite me in the butt 10 years down the lane but doubtful. Lol!
I've used as thin as .118", but on much smaller sized builds. The thickest used has been .220" and only used on 2 opposing sides, rest was built using .180".
I was thinking of 1/4" to prevent bowing over time, assuming that would prevent such warping.
 

Red Eunice

Arachnodemon
Joined
Mar 2, 2014
Messages
666
Going to feed heavy tonight, do my rehousing early tomorrow morning.
They should be more comfortable in these enclosures, twice the size they are in now. :) That is all!!

@viper69, use the .250" acrylic if you feel the necessity of "thicker is better" concept. IMO, .250" is overkill, unless you plan on building a pokie communal encloser. The 14"X14"X30" enclosures I built for Andy had .220" on the 2 sides and .180" on the rest of the pieces. They had an empty weight of 20 1/2 pounds, not bad for large enclosures. My recent ones weigh in at just over 40 ounces empty.
 

Attachments

Last edited:

viper69

ArachnoGod
Old Timer
Joined
Dec 8, 2006
Messages
17,930
Going to feed heavy tonight, do my rehousing early tomorrow morning.
They should be more comfortable in these enclosures, twice the size they are in now. :) That is all!!

@viper69, use the .250" acrylic if you feel the necessity of "thicker is better" concept. IMO, .250" is overkill, unless you plan on building a pokie communal encloser. The 14"X14"X30" enclosures I built for Andy had .220" on the 2 sides and .180" on the rest of the pieces. They had an empty weight of 20 1/2 pounds, not bad for large enclosures. My recent ones weigh in at just over 40 ounces empty.
Those are gorgeous. Let me know when you are selling them :D

Meant to ask you, it seems you chose metal for the hinge material. What made you go with metal over the commonly used plastic ones?
 

Red Eunice

Arachnodemon
Joined
Mar 2, 2014
Messages
666
Those are gorgeous. Let me know when you are selling them :D

Meant to ask you, it seems you chose metal for the hinge material. What made you go with metal over the commonly used plastic ones?
Thanks.
Reasons I use the brass hinges: cost, 4 pack @ $1.79, smaller footprint and they look better, IMO.
Using the leftover piece to make a pair of enclosures for my L. australasiae. Cut out all the parts earlier, will start assembling after the T rehousings. I save usable scraps, nothing to waste. Lol!
 

Red Eunice

Arachnodemon
Joined
Mar 2, 2014
Messages
666
Here's before and after pics of one of the LVs I rehoused this morning. Both nonchalantly walked into new homes with a gentle nudge. Maybe 15 minutes to rehouse both, should be content for some time in these. Was their 2nd rehousing, got them from gromgrom as 1 1/2" slings.
 

Attachments

viper69

ArachnoGod
Old Timer
Joined
Dec 8, 2006
Messages
17,930
Here's before and after pics of one of the LVs I rehoused this morning. Both nonchalantly walked into new homes with a gentle nudge. Maybe 15 minutes to rehouse both, should be content for some time in these. Was their 2nd rehousing, got them from gromgrom as 1 1/2" slings.
Smart idea on the cardboard entry, and like the use of zip ties. Hopefully the T doesn't up with crickets up there as roommates. Appreciate all the pics!
 

Red Eunice

Arachnodemon
Joined
Mar 2, 2014
Messages
666
Smart idea on the cardboard entry, and like the use of zip ties. Hopefully the T doesn't up with crickets up there as roommates. Appreciate all the pics!
Thanks. I do prefer to minimize the possibility of an escape while rehousing as much as possible. Used the bag method, once, didn't go as well as some videos I watched. MO, I've more control in this manner, plus they are reusable.
Tye wraps just keep things from falling over accidentally if the enclosure is moved during feeding. I can be clumsy at times.
Almost have the small L. australasiae enclosures finished from the scrap piece. Just need to pick up another latch and I'll be ready for that rehousing too. Small 4"X2.5"X2.5", they'll only reach an 1" as adults.
Pics are easy to post and worth 1K words. I do have some videos of grooming, feeding and Ts molting, just don't know how to post those. So pictures will need to suffice.
 

Attachments

Top